
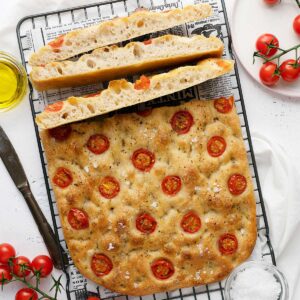
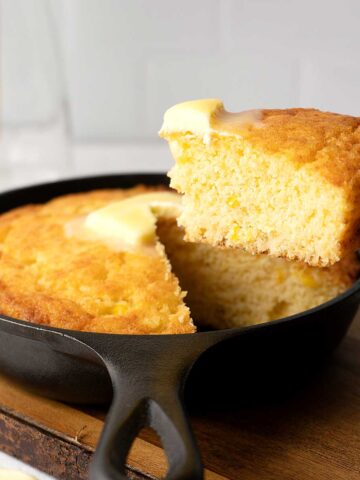
If you're an enthusiast baker like me, then you will definitely have to try this no-knead focaccia bread recipe. It has that artisan rustic look with lots of big-sized air pockets!

📮 Save this recipe for later!
Jump to:
Recipe Highlights
Texture and flavor - Crusty crust, huge air pockets, soft and chewy inside with amazing flavor.
Yield - 1 loaf of 9x13 inch (23x33 cm) sized focaccia enough for 6 people, easily.
Level - Super easy as there's no kneading and fancy machine needed. But you do have to plan this ahead as involves hours of waiting around.
Occasion - Anytime! Lunch, dinner, turn it into sandwiches. Make this to wow anybody, trust me.
What Is Dough Hydration?
Hydration in a dough affects the final texture of the bread. The more hydrated a dough is (has more water), the more holes the bread texture will have.
Dough hydration is the percentage of the weight of water in dough in relative to the weight of flour in it.
Dough hydration (%) = water weight / flour weight
For example:
Dough hydration 60% means the dough has 60 g of water with every 100 g of flour.
The dough hydration is around 60-80% for breads like focaccia or ciabatta.
So when you want those rustic big holes in your bread, expect to have a high hydration dough. Meaning the dough will have lots of water and will be so sticky and difficult to handle.
Today's recipe is with dough hydration at 79%. Yep.

What Is Stretch And Fold Technique?
Since our dough will be very sticky we will use the stretch and fold technique to slowly develop the gluten in it. Developing gluten will strengthen the dough and make it easier to handle.
Stretch and fold is basically stretching the dough and folding it like an envelope. You do it a few times until you feel the dough is stronger. And you also do it with an interval time so that the dough has time to relax.
You can see how I did it in the recipe video below.
The first round is the most difficult, if I have to say since the dough is very sticky. But it gets easier after.
Also, remember to wet your hands beforehand to prevent sticking. Using a large scraper will also help.
Why The 24 Hours Slow Rising?
Slow-rising dough develops more flavor than a fast-rising one.
I've tested this recipe with only 8 hours of slow rising in the fridge. The taste was good but 24 hours of slow rising tastes way better.
If you don't feel like it, you can simply leave the dough at room temperature to rise until it doubles its size before shaping the focaccia, but then.. what's the point? Right?
We want it all. Look, texture, and flavor. Go big or go home.
How To Correctly Bake A Focaccia
We love the golden dark brown color of good focaccia, right? We've taken good care of the dough, and we will do it justice by baking it the right way.
Here's how:
- No fan forced - use conventional heating, meaning don't use the heat with a fan that circulates air in the oven. This is to preserve moisture in the oven.
- High temperature - preheat your oven for at least 30 minutes at 500ºF (260ºC).
- Use a higher rack - use the higher ⅔ rack in your oven to bake your focaccia. This will help getting the color that we want without over baking it. Overbaking it will result in a hard and overly chewy focaccia.
- Rotate - optional. Rotate the baking tray during half baking time to get that even color.
I know today's recipe is a bit different from all the bread recipes that I've made. This recipe will take more of your time but with less effort AND with amazing results.
Give it a try.
In Summary
This no-knead focaccia is:
- perfect for enthusiast bakers who are eager to learn new technique in perfecting their bread making
- requires no kneading
- is a super simple recipe with super easy steps
- has that artisan rustic look with crusty crust, soft chewy texture and amazing flavour
- let's admit it, it's just so darn DELICIOUS!
More Bread Recipes
If you're into more bread recipes, take a look here:
Video
📖 Recipe
No-knead Focaccia Bread Recipe
Video
Ingredients
The Dough
- 1 ¼ cup warm water (310 ml)
- 1 teaspoon active yeast (3 gr)
- 3 cup all purpose flour (390 gr)
- 1 teaspoon salt
Others
- 1 tablespoon water
- 1 tablespoon olive oil
- some cherry tomatoes , cut in halves
- some dry oregano
- some sea salt flakes
- more olive oil
Instructions
The Dough
- Combine warm water and active yeast in a bowl.
- Add in flour and salt. Using a wooden spoon, mix everything well until there are no lumps. Cover bowl with cling film and rest dough for 30 minutes.
- Spread some olive oil on working surface. Place the dough on top.
Stretch & Fold
- Wet your hands to avoid dough from sticking. Grab one side of dough, stretch and fold on top. Do the same with all the other 3 sides as if you're folding an envelope.
- Grab the whole dough and flip it up side down.
- Cover the dough with a generously oiled cling film and leave it to rest for 30 minutes.
- Repeat the stretch and fold process for 3 more times. Watch the recipe video above for better understanding.
Slow Rising
- After the 4th stretch and fold, place the dough upside down inside a generously oiled bowl.
- Cover the bowl tightly with cling film and place it in the fridge for 24 hours.
Assembling & Baking
- Preheat oven at 500ºF (260ºC) for 30 minutes. Place rack on the higher ⅔ level in the oven.
- Line a 9x13 inch (23x33 cm) pan with baking sheet. Pour in generous amount of olive oil.
- Flip the bowl on top of the pan and let the dough slowly fall by itself into it. With wet hands, gently stretch the dough to fit the pan. Careful not to poke the air pockets.
- If it's difficult to stretch, leave it for 10 minutes and then continue stretching. After that leave the stretched dough for 30 minutes.
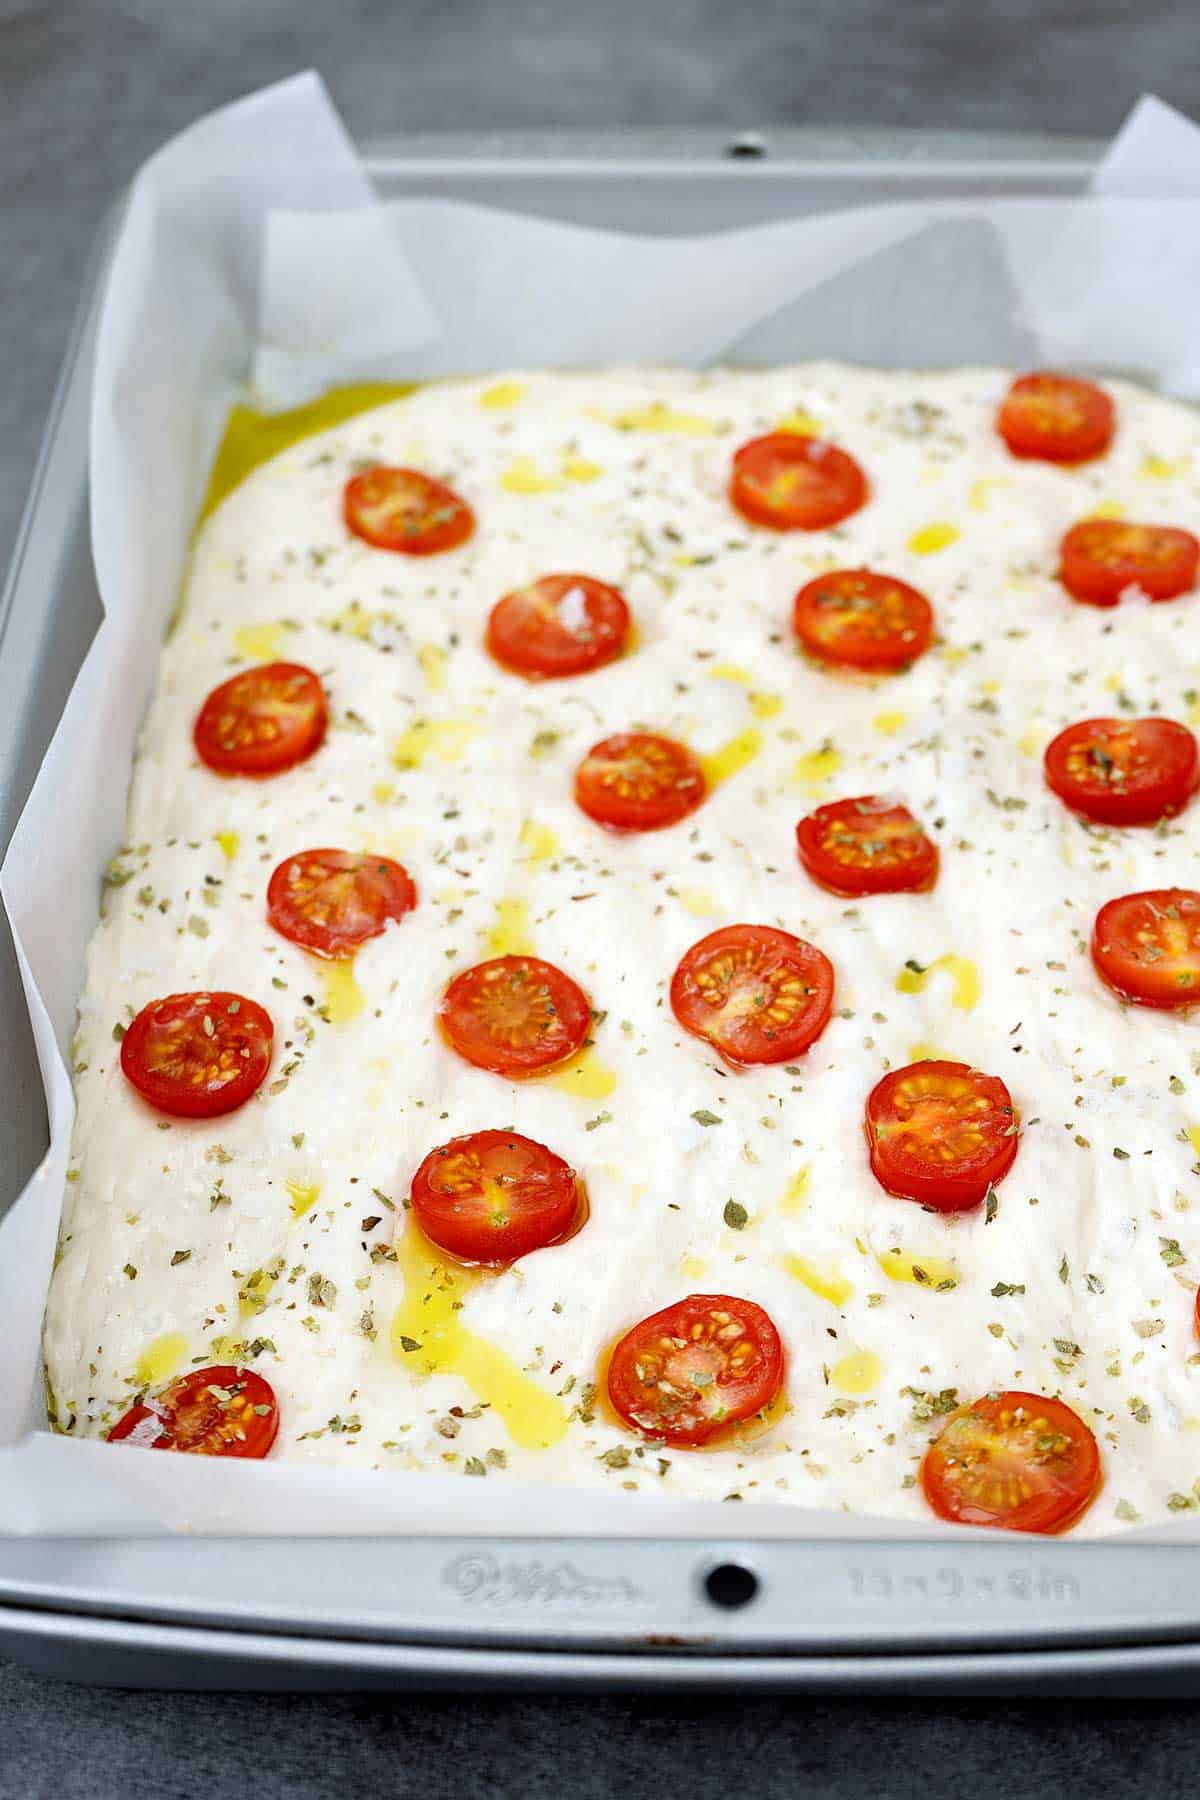
- With wet hands, gently make random indentations on the dough. Place tomato on top.
- In a bowl, mix 1 tablespoon water with 1 tablespoon olive oil to emulsify. Then drizzle on top of the dough. Lastly sprinkle some dry oregano and sea salt flakes.
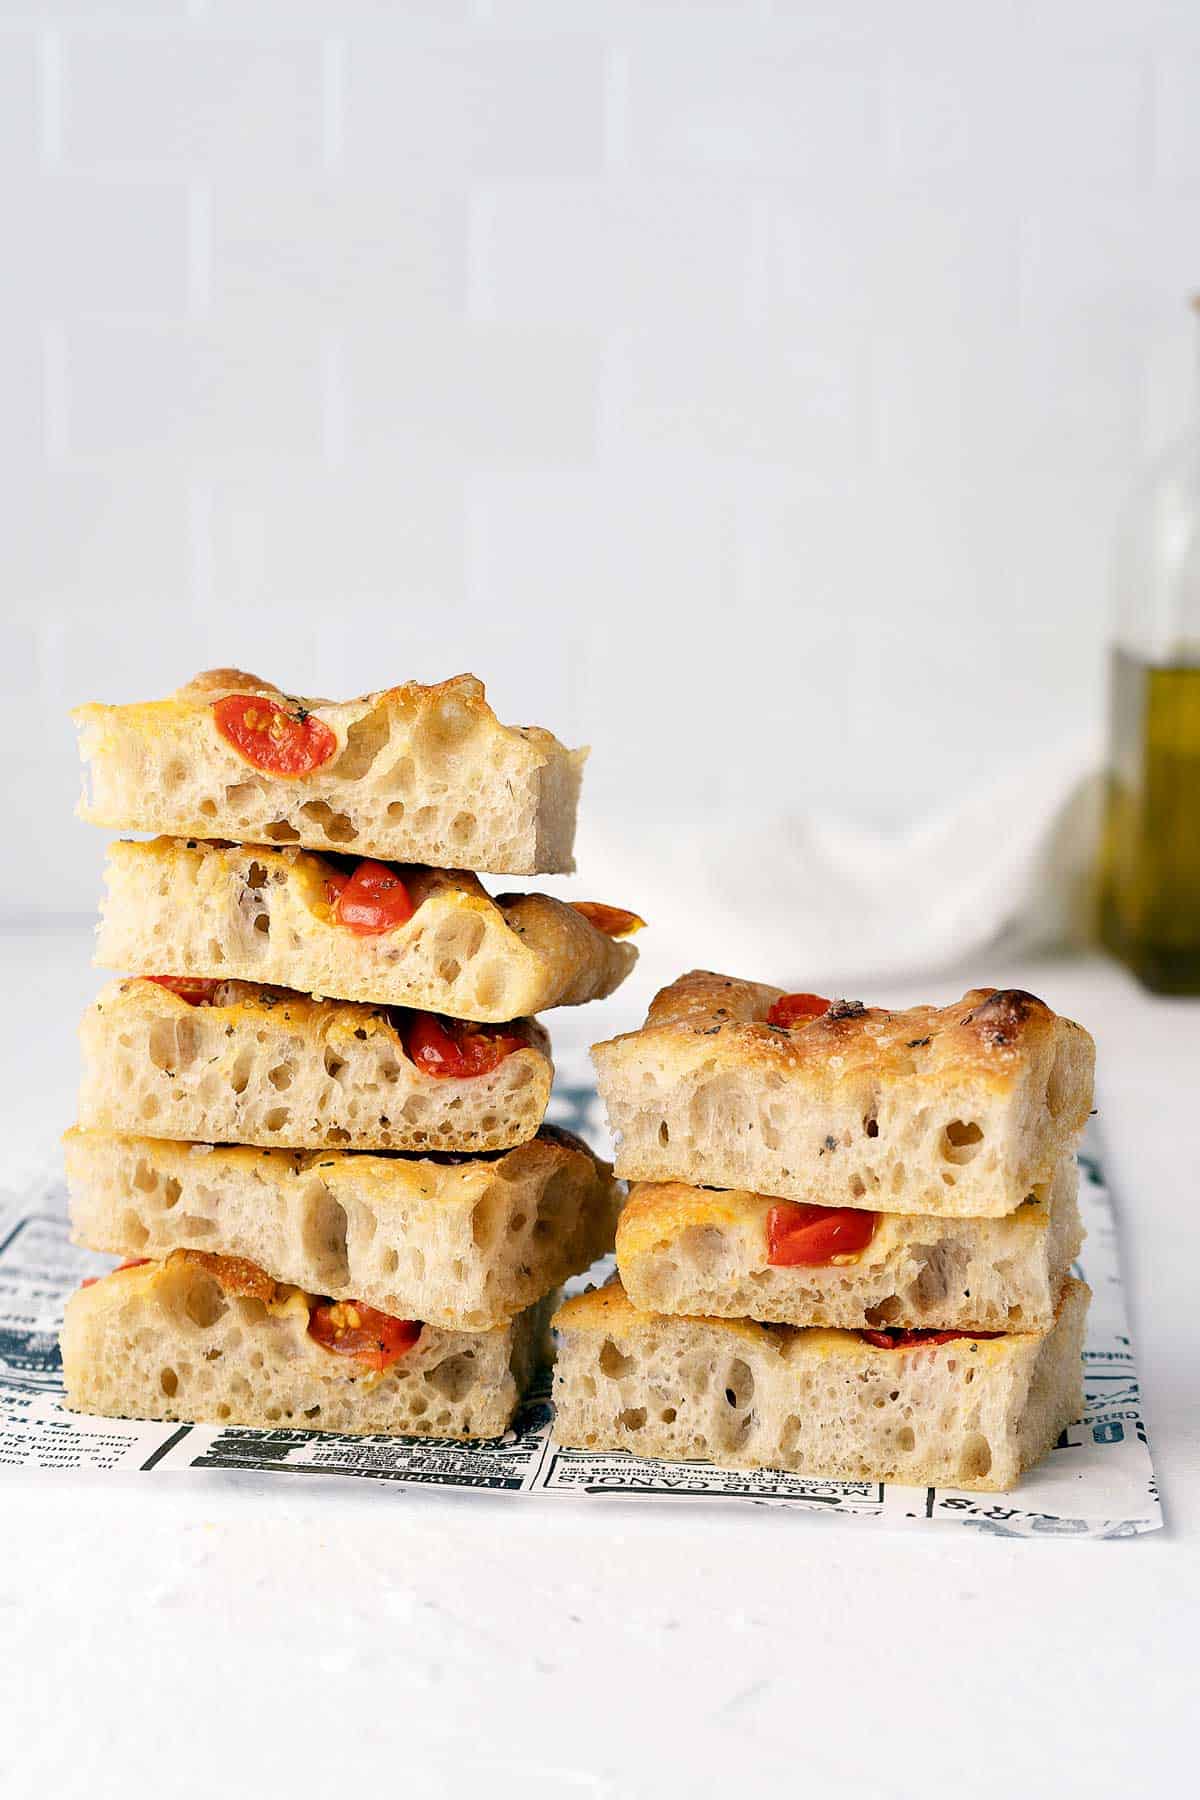
- Bake for 20 minutes or until golden brown and fully cooked.
How To Serve
- Cool the focaccia on a rack for 30 minutes. Slice and enjoy as is or cut in half and make sandwiches out of it.
- Best eaten the day of baking.
Note
- Use a kitchen scale for precise measuring of flour. Use scoop and level method if you're using cup measurement to avoid having more flour than the actual amount for this recipe.
- Please refer to my post above for tips and detailed explanations.
- Although this recipe is forgiving, I really do suggest you using all purpose flour (different flours have different water absorption level, which effects the amount of water needed), in order to have the exact same result as in the video and photos. If you're using bread flour, add bit more water (see the video above for the consistency).
Nutrition Facts
The nutrition facts provided are an estimate per serving. Accuracy is not guaranteed.

Tony says
Fantastic recipe!
Bea & Marco says
Thanks, Tony!
Tony says
My dough was hard to mix and it was dry. why is that?
Bea & Marco says
Thanks for trying the recipe! This dough has a high water content, so if it felt dry and hard to mix, it’s likely too much flour was added. This can easily happen when using cup measurements. To measure flour more accurately, use the spoon and level method: gently spoon the flour into your measuring cup without packing it down, then level it off with the back of a knife. It makes a big difference in getting the right dough texture. If you try it again, using a scale or the spoon and level method will help get the right texture. Hope it helps!
Tony says
Thanks for the tips! However, I messed it up again. I decided to make a second batch, and this time I weighed each ingredient using a scale because I wanted it to be as accurate as possible. But once I got into the baking process and pulled the focaccia out of the oven to cut it into squares, I struggled to get the knife all the way through. When I took a bite, the texture was almost like a cracker, really hard and difficult to chew. It wasn’t airy at all like in the video because mine ended up being mostly crust.
Could it have been the yeast? I used room temperature water, but I don’t own a thermometer though I’m pretty sure the yeast powder I used is still active because it bloomed when I tested it. Could it have been the excessive olive oil? Or maybe the folding process? There are a few things I still don’t understand, but I’m willing to keep trying because I really had fun baking it! Hopefully, I can get some answers.
Bea & Marco says
Hi, Tony! We’re so sorry that happened, but we’re really happy to see you’re invested and giving it another go. The determination and having fun with it is already a win! We’re here to help you get it just right. Here are a few things to check for next time:
1) Did the dough rise? How long did it take? We’ve had this happen (with our panettone) where the yeast bloomed but the dough barely rose. Even if yeast isn’t expired, being stored too long can weaken it a lot.
2) When folding the dough, did it feel stronger or firmer? That means gluten was developing, which is key to getting a nice rise instead of a cracker-like texture.
3) How was the oven temperature? Every oven is different, so we recommend using a portable oven thermometer (they’re super affordable). We use one every time because our oven runs 68–86°FC (20–30°) hotter than the display says.
Let us know how it goes! You've got this!
Tony says
Once again, thank you! I finally did it a couple of weeks ago, lol. The problem was that I overcooked it, which gave it that really hard and crusty texture I mentioned before. But now that I’ve figured out what went wrong, I’ve been having such a blast baking this bread. I’ve already made 4 or 5 batches of focaccia this month!
Tony says
Although, how much water (in ml) should I use when switching to bread flour? I’ve been using all-purpose flour for a while now, but I want to try bread flour instead. You mentioned adding "a bit of water" but unfortunately, I’m not great at eyeballing amounts, and I’d like the recipe to turn out just as good as my previous batches haha! By the way, I’m using the default recipe indicated as ‘1x’ on the website, so it would also be helpful to know the water adjustment for the other serving sizes as well. thank you so much!!
Bea & Marco says
We're so glad to hear you figured it out and have been baking focaccia so often! 4 or 5 batches already, that’s amazing! 🎉
When it comes to bread flour, it usually absorbs a bit more water compared to all-purpose. We’d suggest starting with around 20 ml more water for the 1x recipe, and see how the dough feels. Since you’ve already made the recipe several times, you’ll probably notice the difference in texture right away.
If you scale the recipe up, you can increase the water by the same proportion (about 40 ml more for 2x, 60 ml for 3x, and so on). Think of this as a starting point, and then adjust depending on how the dough behaves for you.
Experimenting is part of the fun with bread baking, and it sounds like you’re well on your way! Can’t wait to hear how your bread flour version turns out! And if you’ve been enjoying this focaccia as much as we do, we’d love if you could leave a ⭐⭐⭐⭐⭐ review on the recipe. It helps others know the recipe works and means a lot to us. Thanks!
Jennifer Welch says
This is my go-to recipe, and Ive made Samin Nostrats' ligurian focaccia but the timing for that is very awkward. This recipe has outstanding results in a fraction of the time!
Bea & Marco says
Your comment really made our day, we're happy to hear that you're loving the recipe! Thank you so much, Jennifer!
Peter says
Did it a couple of times and every time it was simply fantastic, no matter what the toppings were: black & green olives, cherry tomatoes, shallots, smoked bacon, sausages etc. Five stars for the recipe! Very well explained and really very easy to make. I was wondering could the dough be frozen after the final stretch, ans if so how long would it last freezed? Again thanks for the brilliant recipe!
Bea says
I'm happy that you liked it, Peter! Thanks for your feedback. I haven't tried freezing the dough, so I can't really say. Sorry though! Will let you know and update here once I've tried it!
Cher says
This focaccia was amazing! Crispy on the outside, light, airy and tender inside! Soooooo good. Well worth starting it a day ahead! Was even a little fun watching the bubbles get bigger and bigger with each gentle turn! Watching the video really helped me to understand the consistency the dough should be to start and the folding process.
Thanks for a fantastic recipe! Our friends loooooved this bread!
Bea says
Right? And yea, a bit of planning ahead is needed although the steps are super easy. I'm happy that everybody loved it. If you love this, perhaps you'd also love my Spanish ciabatta bread. Thanks for your feedback, Cher!
Heera Khambatta says
Hi El Munro
I truely appreciated your quick response. 👍 ok now I have kept one batch of dough to ferment last night around 10:30 pm. In fridge.
Jus checked it after 16 hours the dough hasn’t risen at all.
I ll bake it around 9 pm tonight.
Hope the end results come out good. 🙏. What would be the reason. I followed your instructions to the tee.
Bea says
Hi, I'm Bea by the way. Regarding the dough, most probably it's the yeast. Either it was expired or it was not activated properly (water was too cold) or killed (water was too hot). I really hope yours turns out good as so many people have made it, even first timers, and got great result. Hope it helps in some way 😍.
Heera Khambatta says
I give u 10/10 for the detailed explanation in your notes.
Thanks appreciated. I wish to bake this bread soon.
One question after preheat at 500 F
DO I bake it also at this high temperature. Please do let me know this. Thanks. G😇D BLESS
Bea says
Yes, bake it at the same temperature. Hope it helps and thank you!
Kristine says
Was wondering if i can use an 8x8in pan instead of a 9x13. really would to try this recipe out. thank you!
Carolina says
Truly incredible, so simple, so happy of the results, definitely recommend, also the youtube video is so nice and relaxing<33
Bea says
It's nice to hear that, thank you so much Carolina! If you liked this focaccia then perhaps you'd also like my Spanish ciabatta recipe. Do check it out 🙂
Wayne says
Turned out perfectly. I topped with shallots, Italian seasoning, sea salt and black pepper. For slightly less mess I did stretch and fold in bowl. Wet hand are a game changer for no stick.
Bea says
That sounds delicious Wayne, thank you for your feedback 😊.
Riley says
I was wondering, would the following be possible?
After the fourth stretch and fold, rather than placing the dough in a bowl, you place it in the dish you're intending to bake it in. Give it half an hour or so to rest and then stretch the dough to fit the pan. Then leave it in the fridge for 24 hours, and when it comes time to bake you don't have to transfer it from one container to another, meaning you don't loose any air bubbles at all. then you could simply add the toppings and bake as normal. The method you used clearly results in an open crumb, but in your video the dough had risen so much more in the bowl.
Bea says
Hi Riley! I haven't tried the way you specified but if you did try it, do let me know how it went 😊.
Lillian says
I just made this and it was amazing!! Appreciate all your tips; they made all the difference. I almost didn’t do the full 24 hour rising time since I was too impatient but did it anyway since you insisted it was much better, and you were so right—-so much more flavorful and totally worth the wait.
Placing the oven rack higher and the high baking temperature resulted in a beautiful golden color and the perfect texture (crispy on the outside but still moist and airy with large holes). Thank you so much!!
Bea says
Hi Lillian! I'm so happy to read that you find it useful and liked it so much! And yes, the 24 hr rising does make a difference, right? Thanks so much for stopping by and leaving a comment 🙂
Najihah Musa says
Hi Bea, my oven can only go up to 450F. Should I extend the baking time? If yes, how long?
Bea says
Hi Najihah! Yes, bake until it's golden brown and when you tap the top surface it makes a hallow sound (and it's not soft). I can't really say the exact minutes though, sorry!
Kevin Cody says
Hi Bea,
My dough is proofing in the refrigerator as I type. I have one concern. I read in a comment response by you that if bread flour is used you would need more water.
I read this after the third folds were completed and the oil was added. The dough was shaggy as I remember at first but turned out nicely and the folding was.
Will I have that chewy large bubble focaccia?
And, will you share the blame for not dropping that flour direction in the recipe? Lol
Enjoy your weekend,
Kevin USA
Bea says
Hi Kevin! Yes, all purpose flour absorbs less water than bread flour. Bread flour alone already give chewy texture to breads (due to its high protein content). Higher hydration gives large bubbles , which in your case it seems that it's lacking a bit. I hope the result came out good regardless. I've added a note to the recipe for risk-takers like you. Haha! Happy weekend, Kevin!
Maria C says
I love this recipe! I’m very fussy about focaccia, so it’s alway disappointing no matter how great the bakery is. It’s too soft andinever chewy enough and I realize the type of flour that generally available here as opposed to Europe, is the majority of the issue. Although a slow rise is also important. This encourages me to make my own without a lot of fuss The recipe works well with just AP flour or with some semolina flour swapped in. I’m looking forward to try some of your other recipes.
Bea says
Happy to know that you liked it, thank you Maria!