
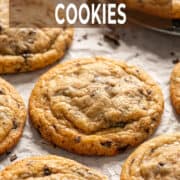
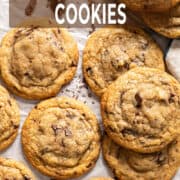
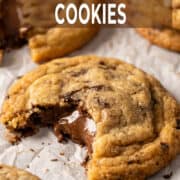
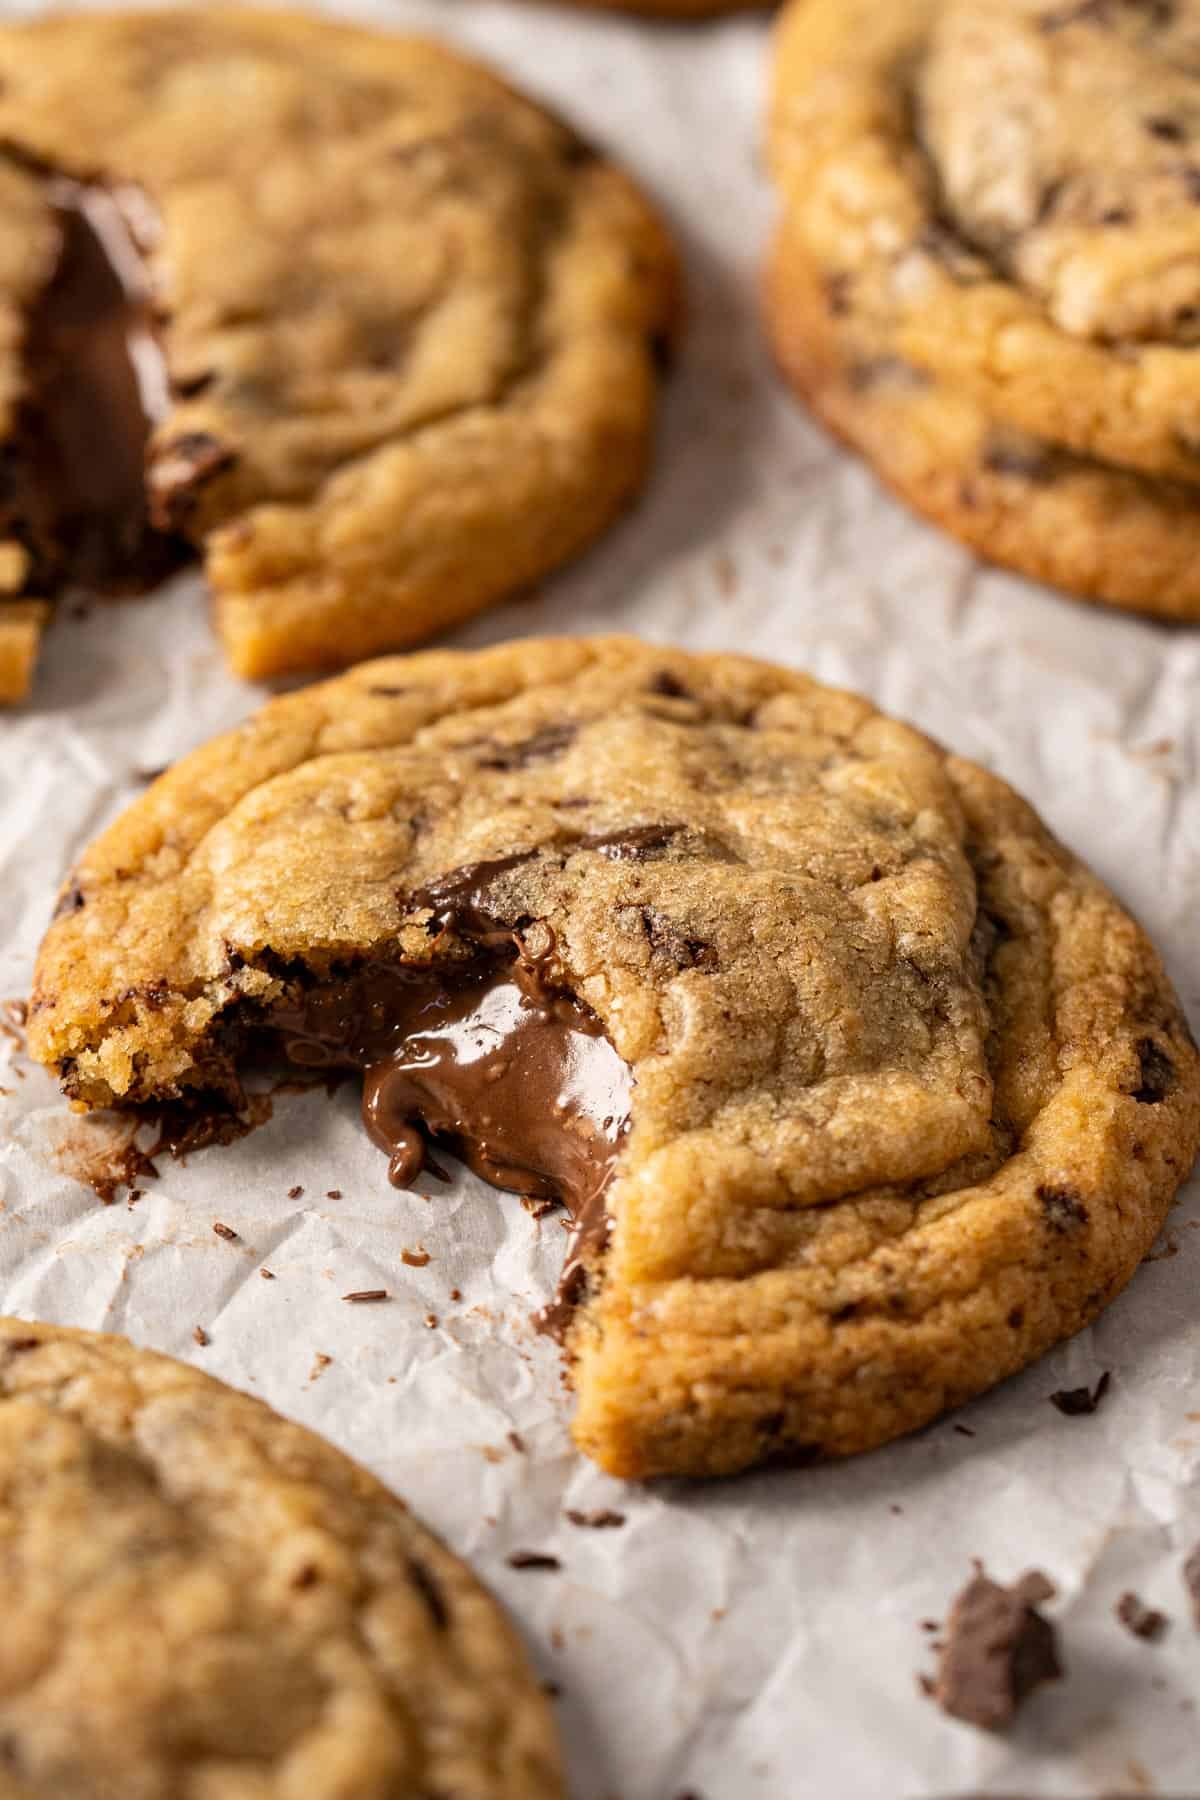
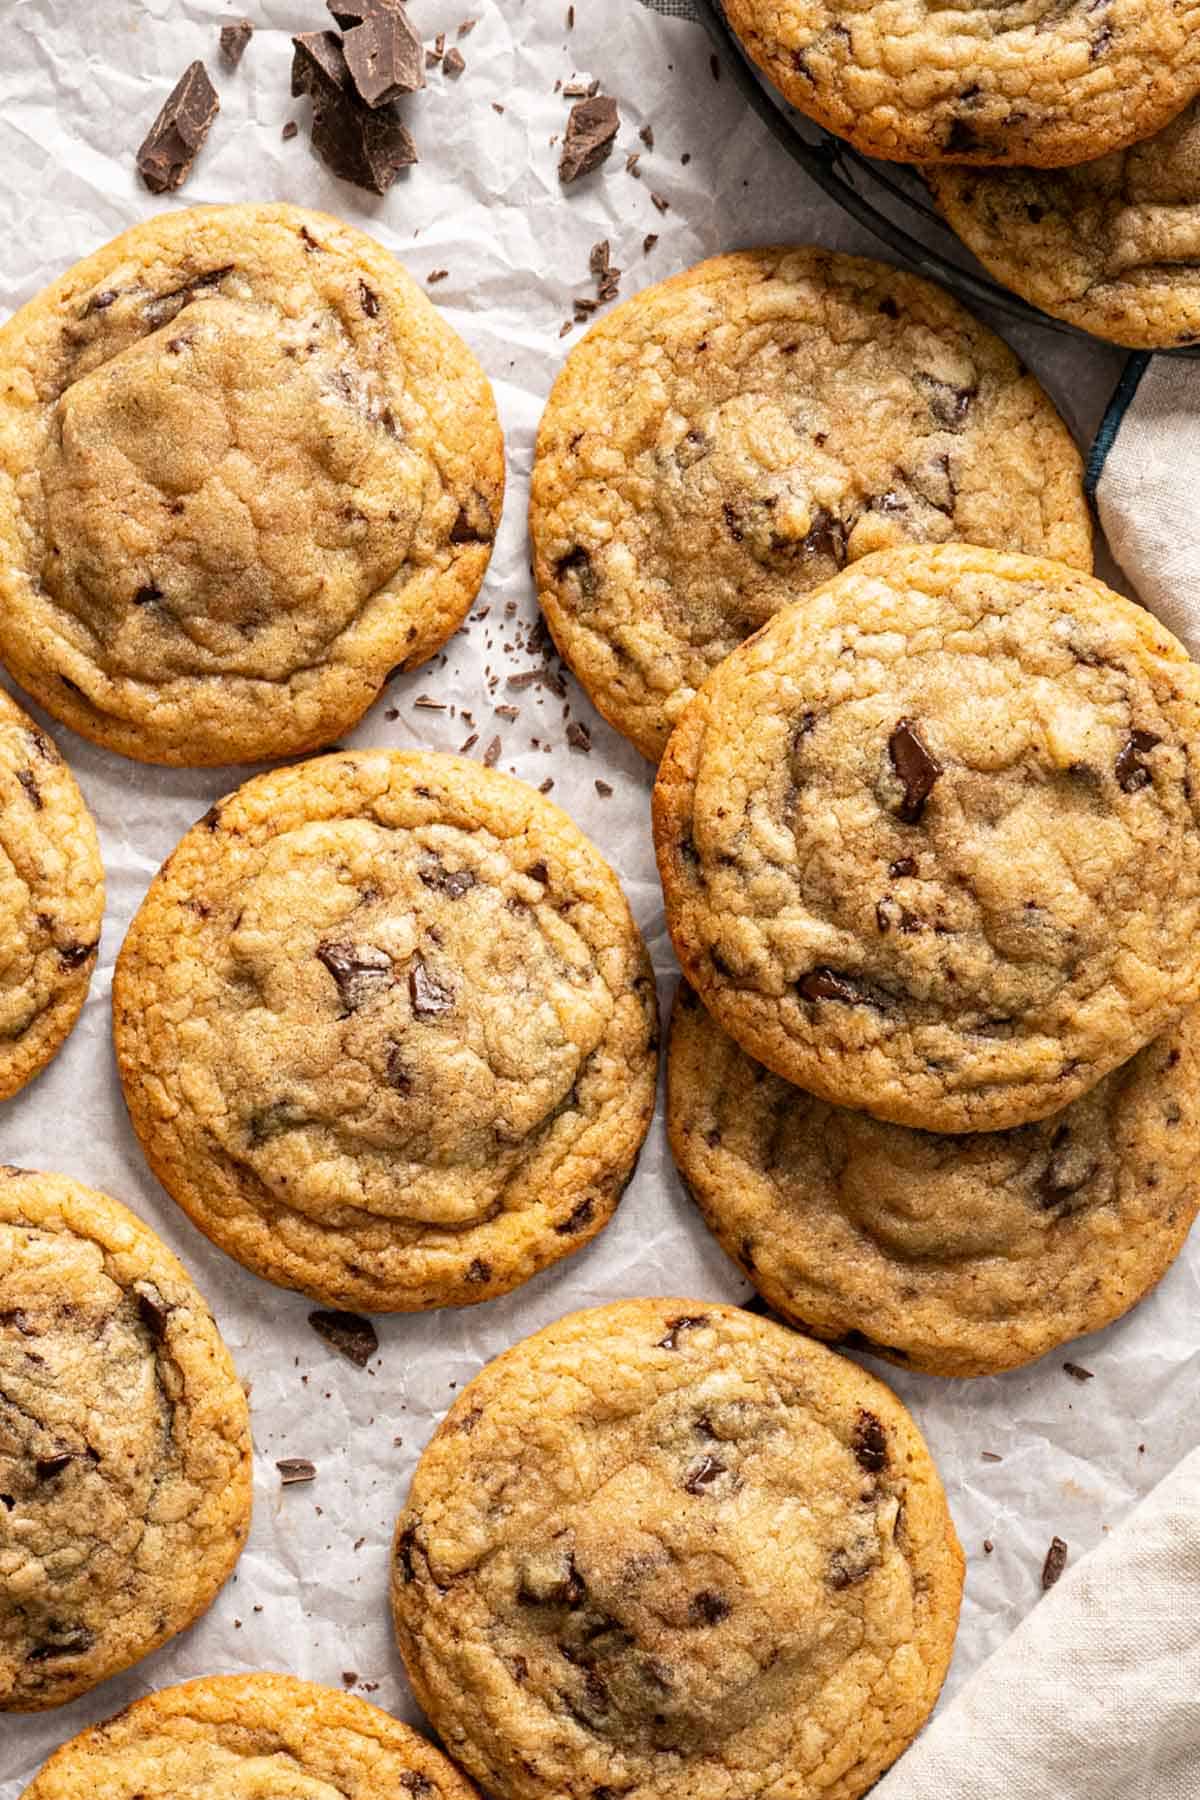
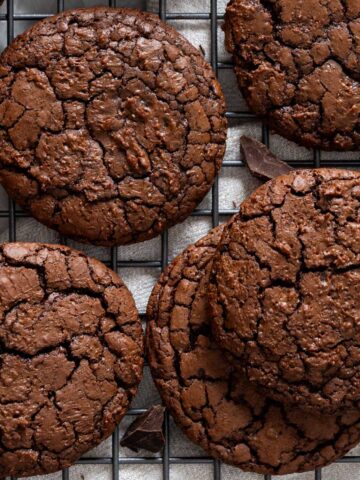
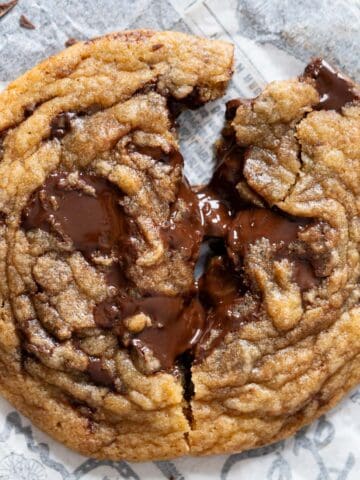
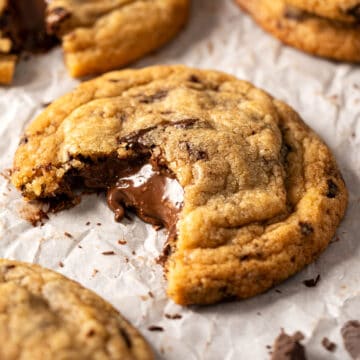
These Nutella-stuffed cookies with chocolate chunks bake with rippled edges, cracked tops, and gooey centers that stretch with every bite. If you've ever wanted bakery-style Nutella cookies that are simple enough for home baking, this recipe has you covered!
📮 Save this recipe for later!
Jump to:
- Why these Nutella-stuffed cookies work
- Pro techniques and cues for perfect Nutella-stuffed cookies
- Ingredients you'll need
- Substitutions and variations
- Watch the video recipe
- Step-by-step instructions
- Best tips for Nutella-stuffed cookies
- Serve, storage, and freeze guide
- Troubleshooting common problems
- Frequently asked questions
- More cookie recipes
- 📖 Recipe
- 💬 Comments
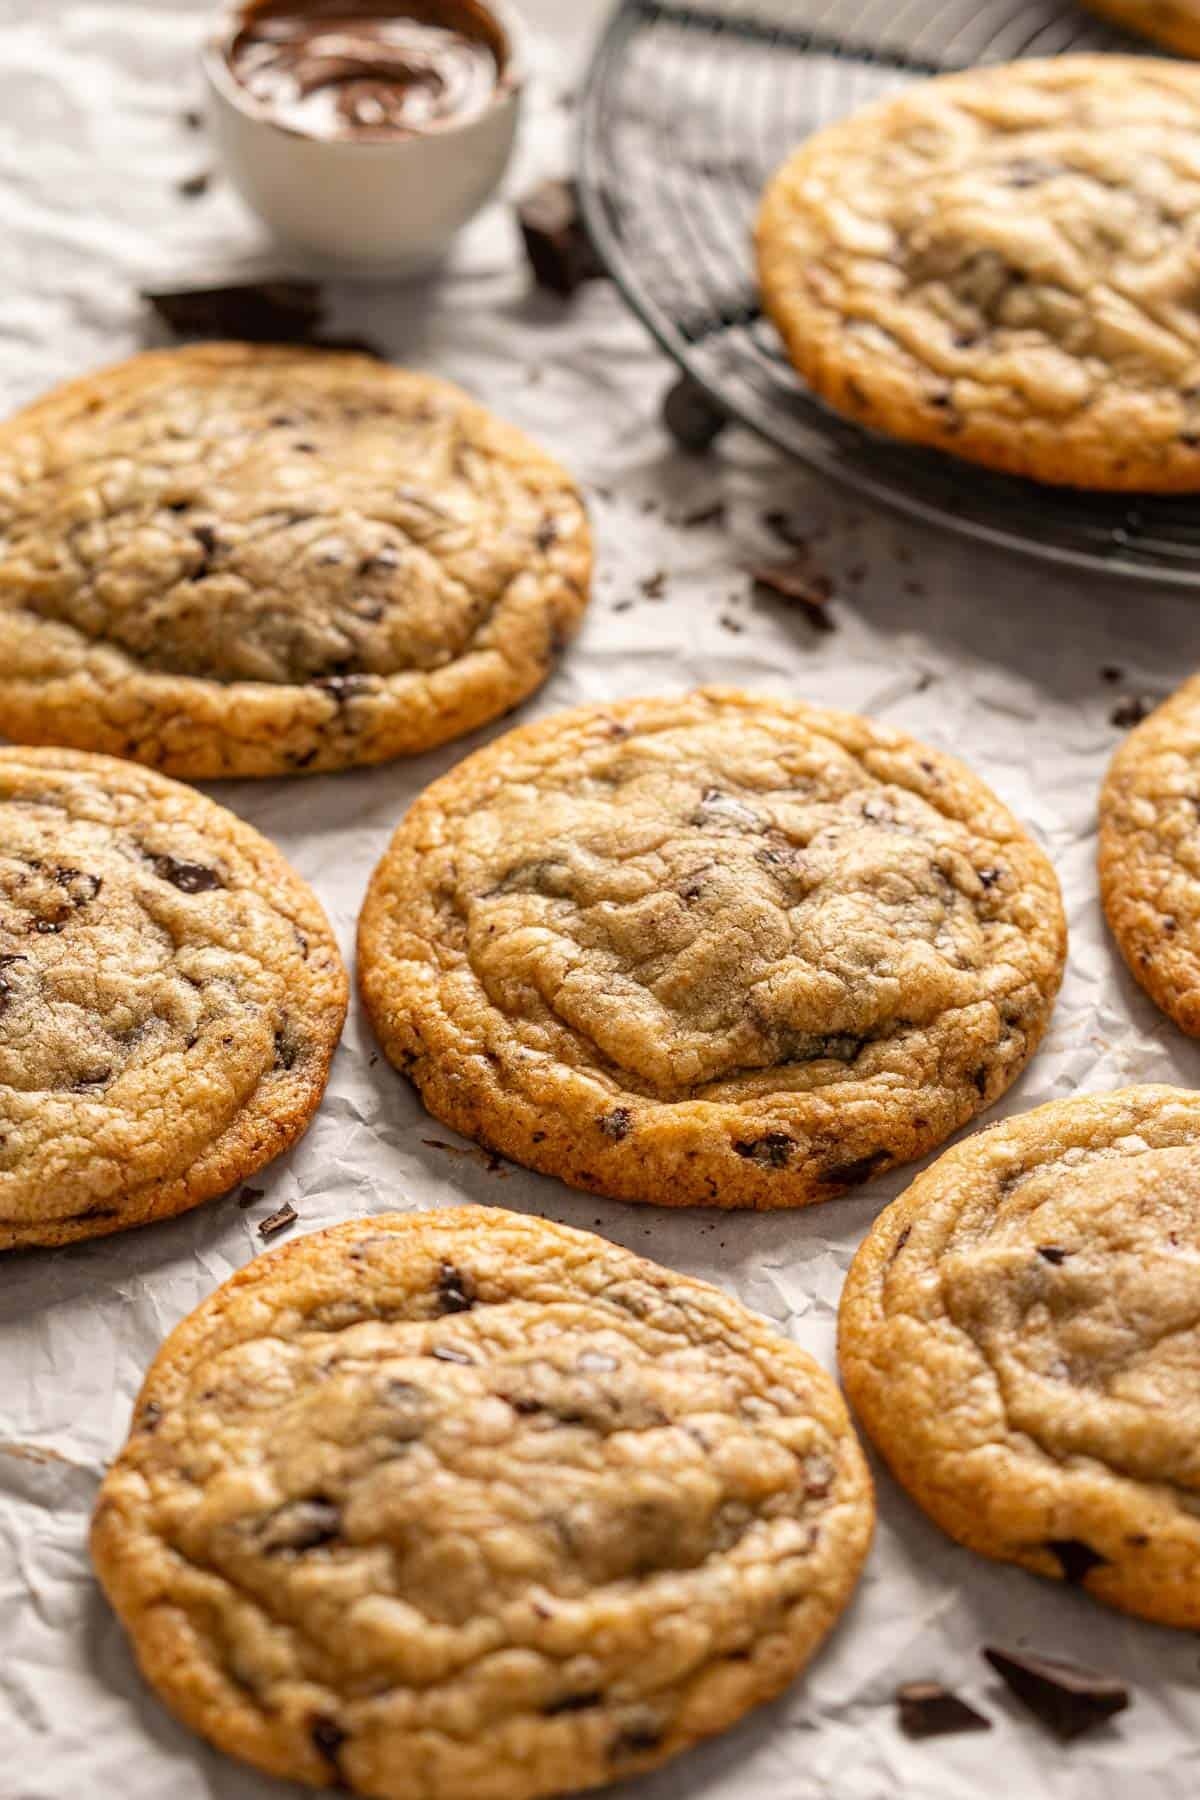
There's a charm in breaking open a warm cookie, its cracked top revealing a gooey swirl of Nutella. It feels like a small triumph, celebrating the joy of creating something special!
This Nutella-stuffed cookies with chocolate chunks recipe guarantees chewy edges and gooey centers, delivering an irresistible bakery-quality experience at home, the kind you'd expect only from Nutella-filled cookies behind the glass of a pastry shop.
If cookies are your happy place, you'll find more inspiration in our cookie collection!
Why these Nutella-stuffed cookies work
You're not just baking cookies; you're creating Nutella-stuffed cookies that look and taste amazing. Here's what you'll love:
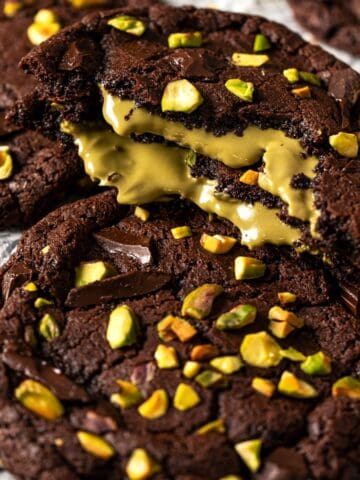
- That gooey Nutella center: Freezing Nutella into discs means your Nutella-filled cookies bake up with melty, stretch-worthy centers every time. For pistachio cream lovers, our fudgy chocolate pistachio cookies are must-try!
- Bakery-style texture at home: Expect rippled edges, chewy middles, and cracked tops that make these Nutella cookies look like they came from a pastry shop!
- Stress-free success: The shaping method is simple and keeps the Nutella tucked neatly inside, so your stuffed cookies come out picture-perfect.
- Indulgent but balanced: Each cookie is sized for the perfect bite, rich, gooey, but never too heavy.
- Tested and foolproof: We've refined and tested this recipe so you can bake with confidence, knowing your Nutella-stuffed cookies will turn out perfectly on the first try!
Pro techniques and cues for perfect Nutella-stuffed cookies
Think of this as your cheat sheet to make sure your Nutella-stuffed cookies bake up with gooey centers and those bakery-style ripples.
- Nutella discs: Scoop and flatten into 1¼-inch (quarter-size) discs, then freeze. This step keeps the filling centered so your Nutella-filled cookies spread evenly instead of clumping in the middle.
- Bottoms and tops: Use the slightly larger portion for the bottoms, pressing them into shallow bowls. Smaller pieces become the tops, which seal the Nutella inside and give your stuffed cookies structure.
- Dough texture: It should press with resistance, like firm clay. If it feels sticky or soft, chill longer. This stage is what guarantees those signature rippled edges.
- Bake cues:
- Minute 6 → Edges spreading, tops puffed.
- Minute 8-9 → Tops turning dull, centers still shiny.
- Minute 13 → Edges golden, centers set but soft.
- Cooling → These cookies are shape-shifters; they'll look puffy out of the oven, then settle into rippled, crackled tops within 10-20 minutes!
- Quick troubleshooting:
- Overspreading → Dough too warm. Chill shaped pucks 10 minutes before baking.
- Nutella leaking → Seam too thin. Patch with a bit of extra dough and chill again.
- Blob of Nutella in the center → Sides too thin. Shape bottoms into shallow bowls with thicker edges.
With these cues in mind, your stuffed Nutella cookies will come out chewy, gooey, and photo-ready every time!
For another cookie with the same perfect chew, try our chewy chocolate chunk cookies and peanut butter stuffed chocolate cookies.
Ingredients you'll need
Here's what you'll need to make Nutella-stuffed cookies with bakery-style texture and gooey centers!
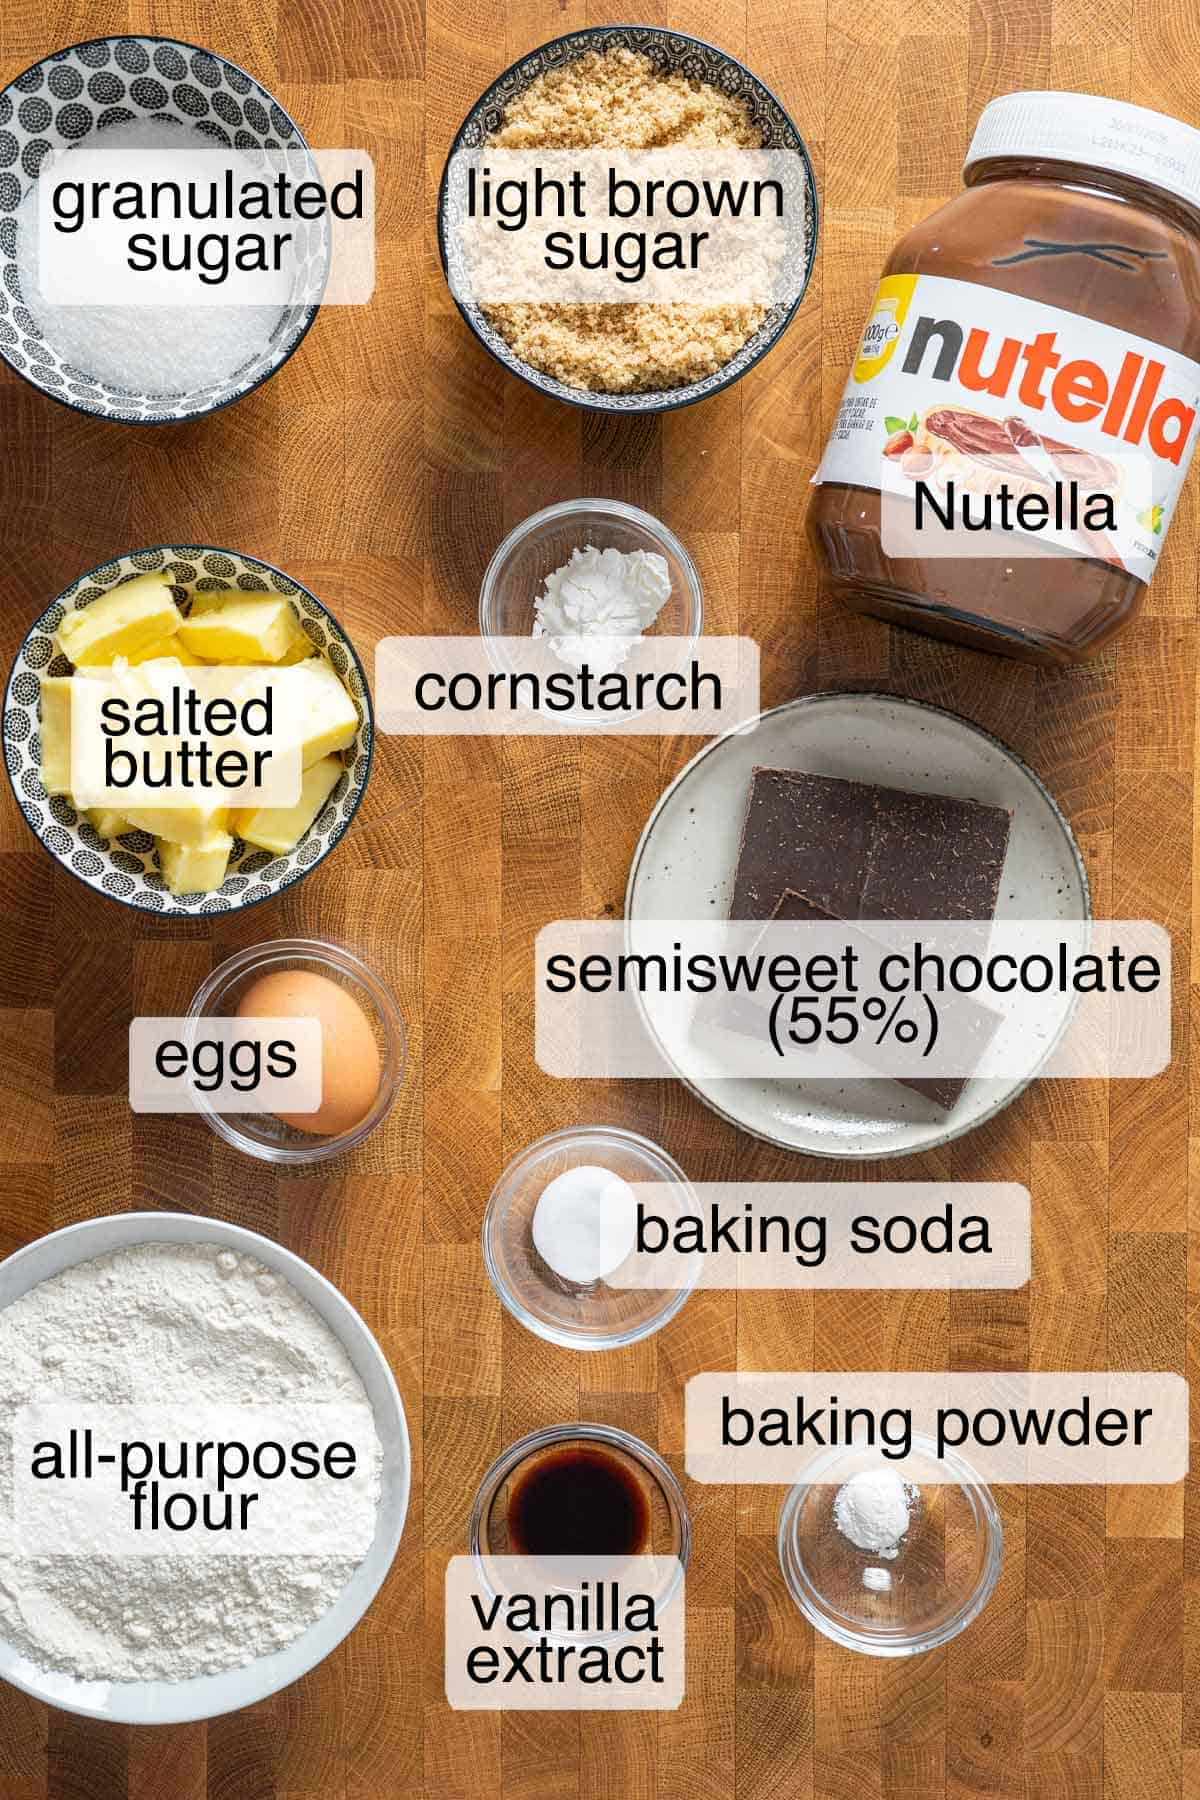
Key ingredients note:
- Nutella: The star of the show, giving you that gooey, melty center.
- Salted butter: Melted and cooled for a chewy texture and rich flavor.
- Light brown sugar: Adds moisture and a subtle caramel note.
- Granulated sugar: Balances sweetness and helps the cookies spread.
- Egg: Binds the dough and adds richness.
- All-purpose flour: The structure that holds everything together.
- Cornstarch: Our secret! Adds chewiness and keeps the centers soft and tender.
- Baking soda and baking powder: A balanced combo for lift and rippled edges.
These ingredients come together to give your Nutella-stuffed cookies their signature gooey centers!
You'll find all the exact measurements in the recipe card below.
Substitutions and variations
No Nutella? No problem. These swaps and flavor twists keep the gooey center but let you change things up!
- Nutella: Swap with peanut butter, almond butter, or Biscoff for a different flavor but the same gooey center!
- Chocolate: Any baking chocolate you love works; dark, semi-sweet, or even milk chocolate is suitable for sweeter cookies.
- Toasted hazelnuts: Add 2-3 tablespoon toasted hazelnuts to the dough for extra crunch and to double down on Nutella's hazelnut flavor.
- Espresso powder: Stir into the dough for a mocha kick that makes the chocolate deeper.
- Nutella-stuffed chocolate chip cookies: Swap the chopped chocolate for chips and lean into the classic combo!
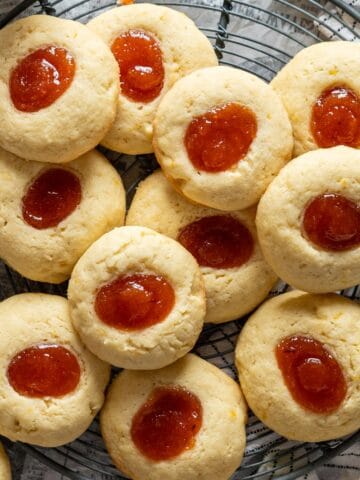
Regardless of the twist you choose, you'll still enjoy the signature gooey pull that makes these Nutella-stuffed cookies irresistible. And if you love filled cookies in other forms, try our thumbprint cookies with jam.
Watch the video recipe
Watch how we shape and bake these amazing Nutella-stuffed cookies step by step.
Step-by-step instructions
Follow these steps for gooey Nutella-stuffed cookies with bakery-style ripples.
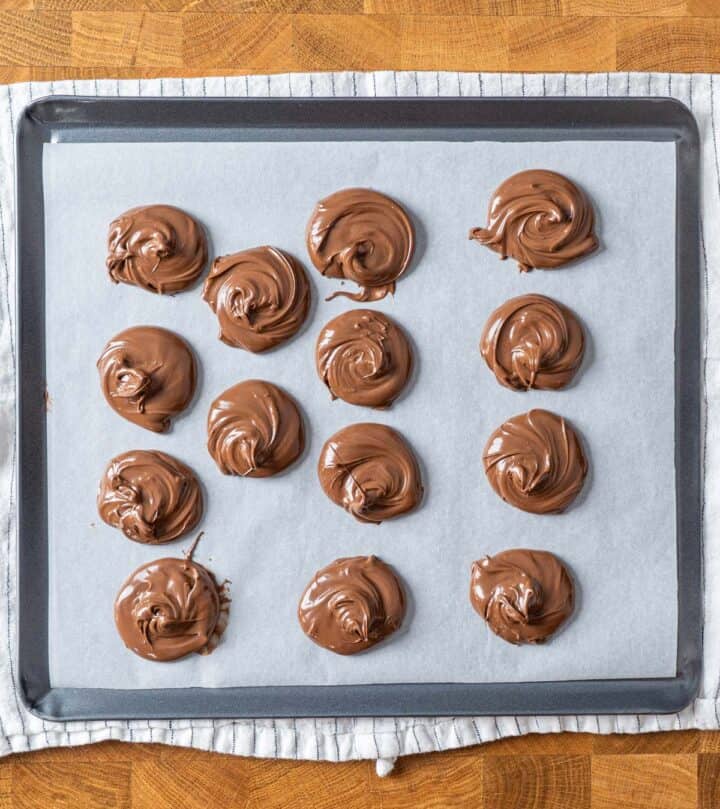
Nutella discs
Scoop ~1 tablespoon (~20 g) Nutella, flatten into about 1 ¼ inch discs, then freeze until firm.
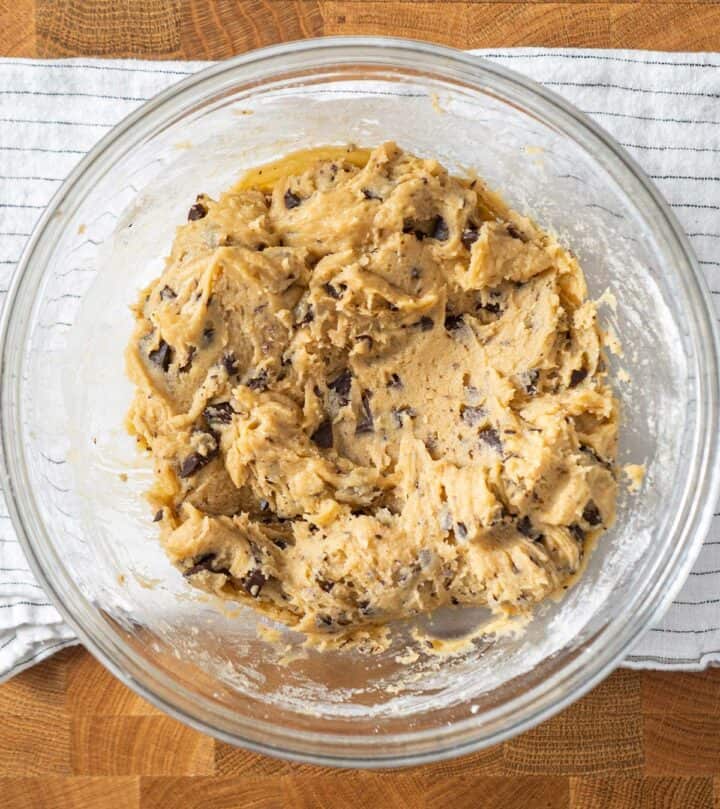
Make the dough
Whisk melted butter and sugars until glossy, then mix in egg and vanilla. Fold in dry ingredients and chopped chocolate.
Dough slab
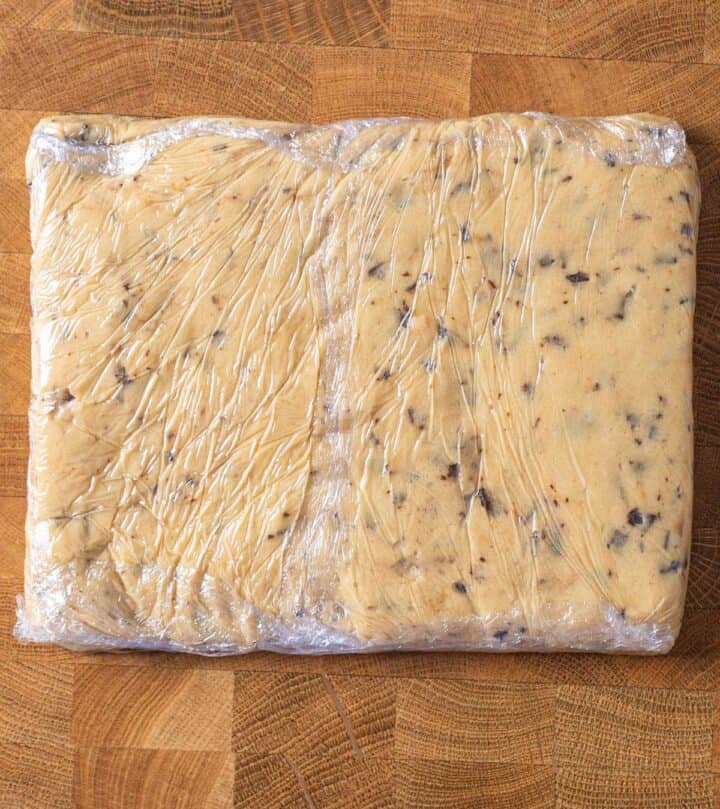
Flatten the dough into a rectangle, wrap it, and freeze until firm like cold clay.
Portion
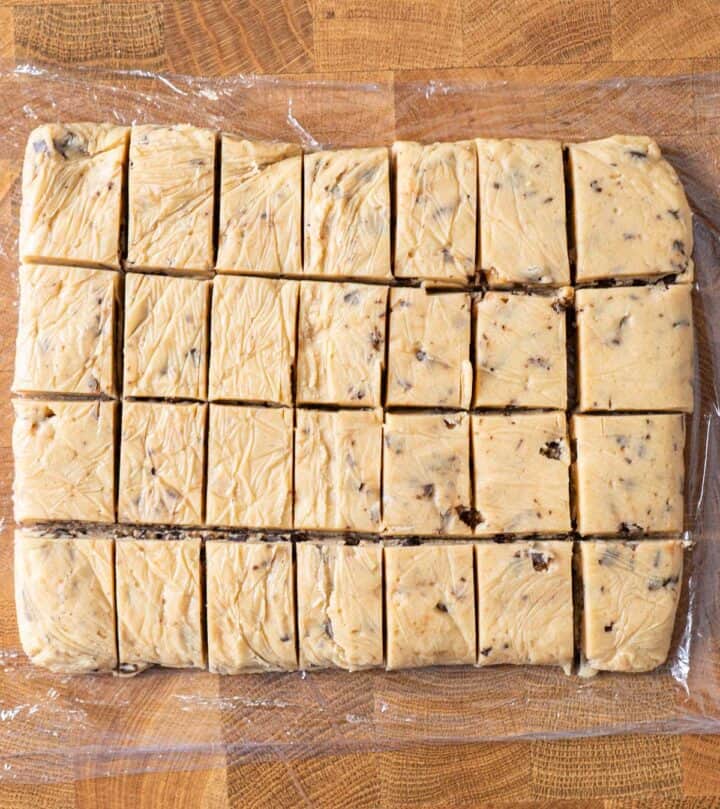
Cut frozen dough into bottoms and tops for shaping, making 28 pieces for 14 cookies.
Bottoms
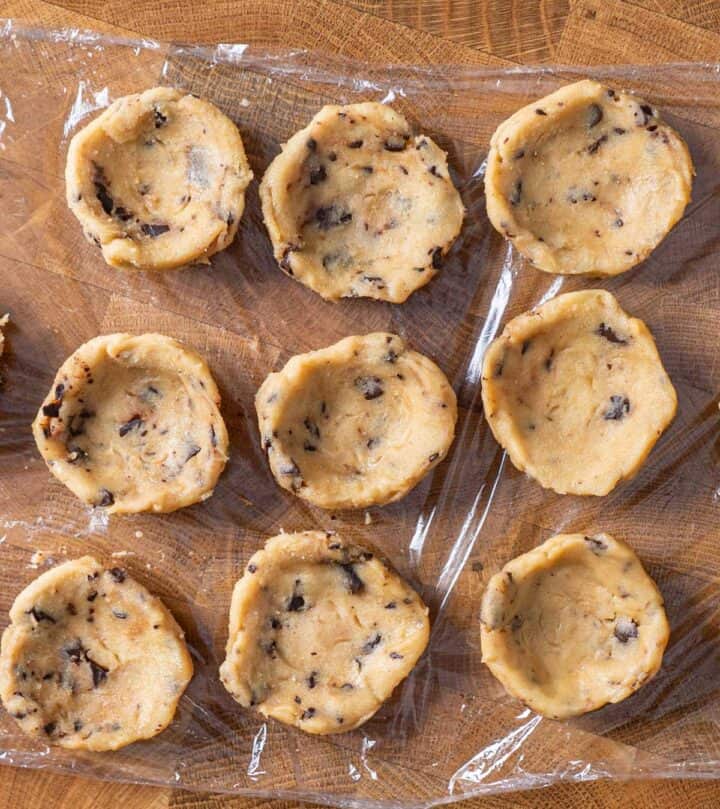
Shape into 14 shallow bowls with thicker edges.
Add Nutella
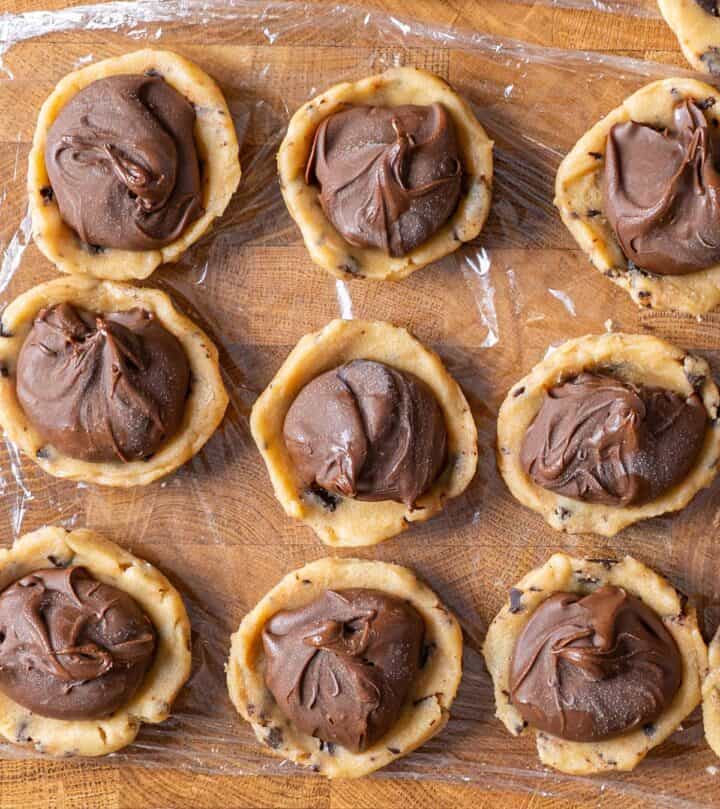
Place frozen discs inside each bottom.
Seal tops
Cover with 14 dough tops, pinch seams upward, and cup into proud pucks.
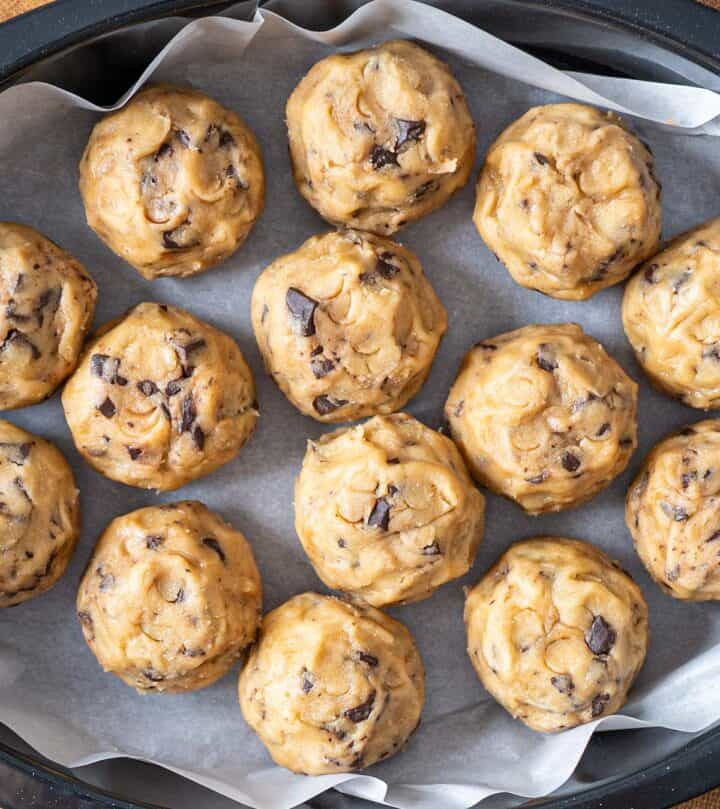
Chill
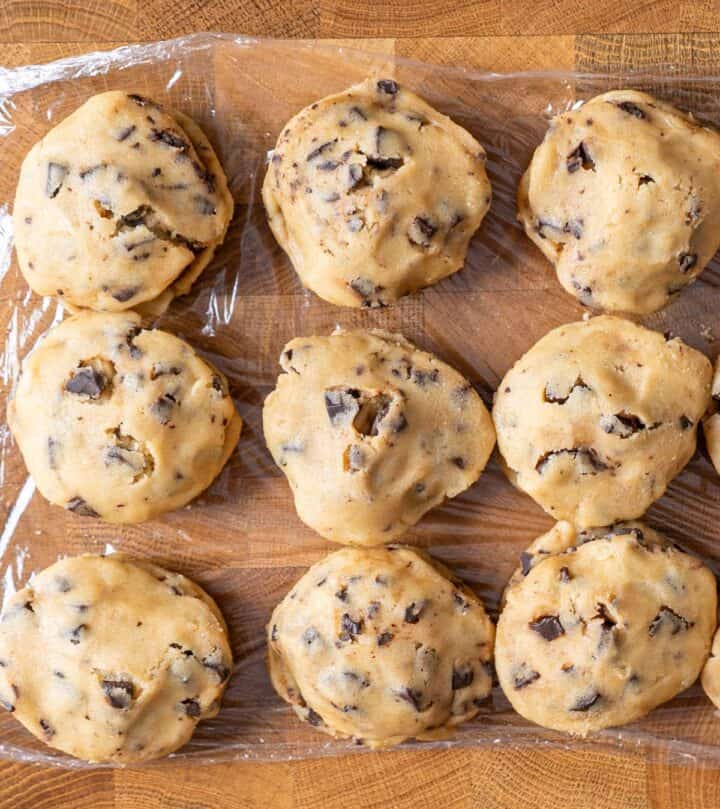
Press fingertips gently into each puck to create surface texture for ripples and cracks. Chill shaped cookies before baking.
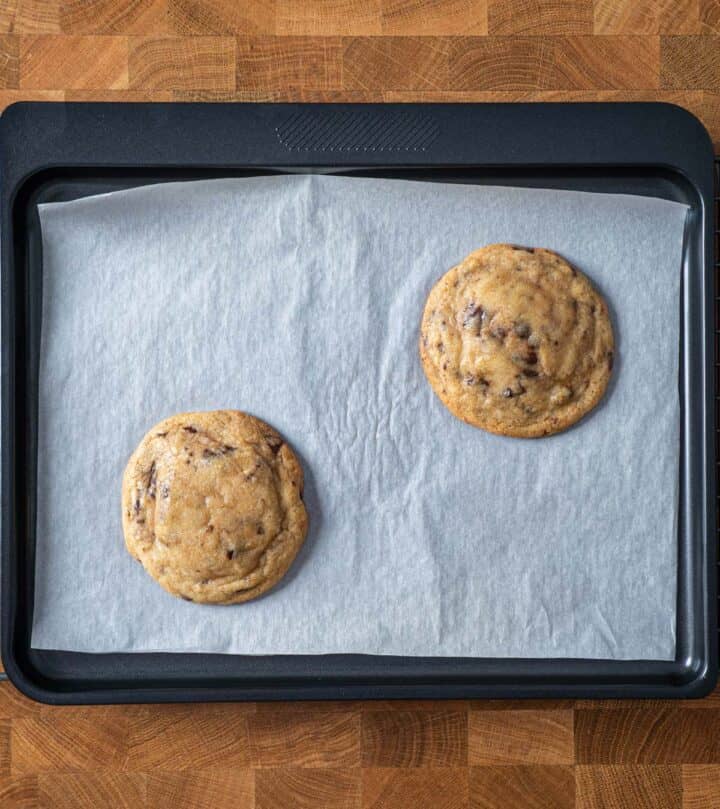
Bake
Bake at 350°F for 11-13 minutes. Pull your Nutella-stuffed cookies when edges are set but centers still look soft. They'll change their looks and have more pronounced ripples as they cool.
Best tips for Nutella-stuffed cookies
- Freeze the Nutella discs: This keeps the filling centered and prevents leaks.
- Chill the shaped pucks: They should feel like cold, firm clay before baking. That's how you get ripples instead of flat cookies.
- Texture the tops: Press your fingertips into each puck for those crackly, bakery-style surfaces.
- Bake one first: Testing a single cookie lets you check the spread and adjust chill time before baking the rest.
- Serve warm: These cookies are at peak gooeyness right out of the oven.
Serve, storage, and freeze guide
To enjoy your Nutella-stuffed cookies at their best, follow this quick guide.
Serve
- Serve warm: These cookies are at their best when served warm and shared! That's when the Nutella stretches and oozes for the best bite!
- Pairings: Cold milk or hot coffee keep these indulgent but balanced.
- For another dramatic dessert, check out our fudgy brownie cookies!
Store
- Keep these Nutella-stuffed cookies in an airtight container at room temperature for up to 3 days.
- A 10-second microwave warm-up restores that oven-fresh softness.
Freezer
Freezing lets you bake your Nutella-stuffed cookies on your schedule while keeping their bakery look!
- Freeze unbaked: Shape into pucks and freeze. Thaw overnight in the fridge, then bake as directed.
- Bake from frozen (quick option): Add 1-2 minutes to the bake time. The cookies will still taste amazing, but the ripples may be less dramatic.
- Freeze baked: Store in an airtight container for up to 2 months.
- Thaw at room temp or warm them in the microwave for a just-baked taste.
Troubleshooting common problems
The dough for these Nutella-stuffed cookies is naturally soft, that's what gives you gooey centers and rippled edges! We freeze it first so it's easy to handle, then keep the shaped pucks chilled until baking.
If something doesn't look quite right, here's how to fix it fast:
- Overspreading → Dough too warm. Chill shaped pucks 10 minutes before baking. They should feel like cold, firm clay before going in the oven.
- Nutella leaking → Seam too thin. Patch with extra dough and chill again.
- Blob of Nutella in the center → Sides too thin. Shape bottoms into shallow bowls with thicker edges.
- Fewer ripples → Oven too hot or dough too cold. Lower the heat slightly or let the pucks rest at room temperature for 5 minutes before baking.
- Test one first → A smart practice! Bake a single cookie before doing the full tray. Note the puck temperature and spread. If it spreads too much, chill longer; if too tight, let the dough rest a few minutes before baking.
Frequently asked questions
Yes, there are two main reasons for freezing Nutella. First, it's easier to handle and keeps the filling centered while shaping the cookies. Second, it bakes better; if added soft, it melts too quickly, causing leaks. Freezing slows the melt, allowing the dough to set and resulting in gooey centers in your Nutella-stuffed cookies.
Absolutely. Freeze shaped pucks and thaw in the fridge before baking for the best ripples. Or freeze baked cookies up to 2 months and rewarm for gooey centers.
The dough was too warm. Chill the shaped pucks 10-15 minutes before baking so your Nutella-stuffed cookies hold their shape.
Follow the shaping and chilling cues. Remember, these Nutella-stuffed cookies are shape-shifters: puffed in the oven, then settling into rippled, crackled tops as they cool!
This Nutella-stuffed cookies with chocolate chunks recipe guides you to success, from freezing Nutella discs to shaping and chilling the cookies. The result? Nutella-stuffed cookies that look bakery-made but are easy to make at home.
Bake a batch, crack one open, and savor the gooey filling. These cookies are a delightful treat you'll want to make again whenever a sweet craving strikes!
Did you try these Nutella-stuffed cookies with chocolate chunks?
We'd love to hear from you! Leave us a ★★★★★ rating and drop a comment below - tell us how it went, what you enjoyed, or what you'd tweak. And if you share it on Instagram, don't forget to tag us - we'd love to see them!
Thank you! -Bea and Marco
📖 Recipe
Nutella-Stuffed Cookies with Chocolate Chunks
Video
Equipment
Ingredients
Filling
- ¾ cup (280 g) Nutella
Dry ingredients
- 2 cup (260 g) all-purpose flour
- 1½ teaspoon (5 g) cornstarch
- ½ teaspoon baking soda
- ¼ teaspoon baking powder
- ¾ teaspoon salt
Wet ingredients
- ¾ cup (170 g) salted butter melted and cooled
- ¾ cup (150 g) light brown sugar, packed
- ½ cup (100 g) granulated sugar
- 1 large egg
- 2 teaspoon vanilla extract
- 4 oz (110 g) semisweet chocolate 55% chopped into chunks
Instructions
Filling
- Line a tray with parchment. Scoop 1 tablespoon Nutella (20 g) per cookie. Mount into discs of 1¼-inch (quarter-size) or 3.2 cm wide. Freeze for at least 45 minutes or until solid frozen.¾ cup Nutella
Dry ingredients
- In a bowl mix flour, cornstarch, baking soda, baking powder, and salt. Set aside.2 cup all-purpose flour, 1½ teaspoon cornstarch, ½ teaspoon baking soda, ¼ teaspoon baking powder, ¾ teaspoon salt
Wet ingredients
- In a large bowl, whisk melted, cooled butter with both sugars for a minute until glossy and thickened.👉 Cue: looks like damp sand that clumps slightly when lifted.¾ cup salted butter, ¾ cup light brown sugar, packed, ½ cup granulated sugar
- Whisk in egg and vanilla until smooth, thick, and lighter in color. Fold dry into wet just until no streaks remain. Fold in chopped chocolate.1 large egg, 2 teaspoon vanilla extract, 4 oz semisweet chocolate 55%
First chill
- Flatten dough into an 8 × 7 inch (21 × 18 cm) block, wrap in cling film, and freeze 15 minutes (or fridge 1 hour) until firm.👉 Cue: dough should feel like cold clay — firm enough to cut cleanly, not sticky, but not rock-hard.
Portion
- Cut the dough into seven strips, then cut each into four, ending up with a total of 28 pieces. We're making 14 cookies, and each is built with two pieces, one for the base and one for the top.
- Take one piece, flatten it into a round of 2 inches (5 cm) wide, pressing the center thinner and leaving the edges thicker (shallow bowl shape). Place on parchment. Repeat to get a total of 14 bottom pieces.
- Take another piece, flatten it into a round, again leaving the sides slightly thicker. Place on parchment. Repeat to get a total of 14 top pieces.👉 Tip: If the dough feels too soft or sticky, freeze it for 5 minutes.
Assemble
- Place a Nutella disc into each bottom bowl. Cover with a top, pinch seams closed, pulling some dough upward into the side seam.
- Cup gently into a "proud puck" (slightly taller than wide, ~1.1:1 ratio).
- Texture the top by lightly pressing with your fingertips. Puck should look rustic and slightly uneven, not a smooth ball.👉 Reminder: thick top/bottom = Nutella blob. Thick sidewalls = Nutella layer (our aim)
Second chill
- Freeze 15-20 minutes (or fridge 1 hour) until pucks feel firm like cold clay.👉 Cue: when pressed, they should give slightly with resistance, but not squish flat or pinch off dough.
Bake
- Preheat the oven to 350°F (175°C). Line a tray with parchment paper.
- Arrange pucks on parchment-lined tray, leaving 3-4 inches (7.5-10 cm) of space between them. Bake for 11-13 minutes on the middle rack. Pull when edges are golden and centers are set but soft
- Oven behavior timeline0-4 min: Pucks hold shape, edges just starting to soften.5-7 min: Edges spreading outward, tops dulling slightly, still domed.👉 Check: this is your early indicator. If spreading too fast = the dough is too warm. If no spread = the dough is too cold.8-9 min: Edges golden, first fine cracks appear, centers pale and puffed.10-12 min: Ripples deepen, centers still soft and glossy. Nutella molten inside.13 min (max): Edges firm, centers set but chewy. Cookies may sink slightly as steam escapes.
- Rest on the tray 10 minutes, then transfer to a wire rack. They come out puffy but will sink, crack, and show ripples within those minutes!
Notes
- Measure flour accurately: For best results, use a kitchen scale. If using cups, measure with the spoon-and-level method (spoon flour into the cup, then level off with a knife). Scooping directly from the bag will pack in extra flour and make the cookies tough and dry.
- Dough texture: After each chill, dough should feel like cold clay - firm enough to cut cleanly, not sticky, but not rock-hard.
- Make ahead: You can freeze shaped pucks for longer storage. Before baking, thaw in the fridge until they return to that cold clay texture. Baking from frozen will make them spread less and lose ripples.
- Chocolate: Use a mix of chopped chocolate chunks and a few chips. Chunks melt into gooey pockets, while chips hold their shape for contrast.
- Serving: Best enjoyed warm for gooey centers. Reheat in the microwave for 8-10 seconds to bring back the ooze.
Nutrition Facts
The nutrition facts provided are an estimate per serving. Accuracy is not guaranteed.
Originally published on Dec 20, 2017. Updated with improved text, recipe, and pictures on Sep 27, 2025.


Janette says
These cookies are Amazing. I make cookies for my grandson,s football team as an after match treat and as one of his favourite things to have as a treat is Nutella I thought I would try theses cookies. Neither he or I was disappointed they were wonderful and were immediately requested for next week. I have a fan forced oven so I baked them at 160 degrees C for 11 minutes and they were perfect. Thank you
Bea says
It warms my heart to hear that, Janette. I wish nothing but victories to your grandson's team and for his grandma to keep baking cookies! Thank you so much for your leaving your comment.
IW says
Thanks for your recipes, love it!
Can I use vegetable oil to replace butter?
Bea says
Hi! I haven't tried tried it but, yes you can but there has to be some testing and tweaking to the recipe though. It's not simply just replacing it as it'll effect the look/texture of the cookies. Sorry! Anyways, glad that you like the recipes, thank you!
Rubi Horthum says
I made the cookies last year for gifts. Now I want to make them again for V day!
They were very tasty.
Thanks for the recipe!!!
Bea says
Yeay 🙌! They're fun and easy to make also, right? Thanks Rubi!
Dunny says
Best nutella cookies that I have ever made. Thank you for sharing a very detail tutorial video and explanation for the recipe. God bless!
Bea says
Yeay! I'm happy that you enjoyed them so much. Thank you for your feedback Dunny!
Bea says
Yes, if you change the amount or type of ingredients in a baking recipe you will always get a different result. About the dough temp, just put in the oven as soon as you are done shaping them. I suggest you make the recipe as is and read my tips above in the post about how to handle the dough while baking. Cheers!